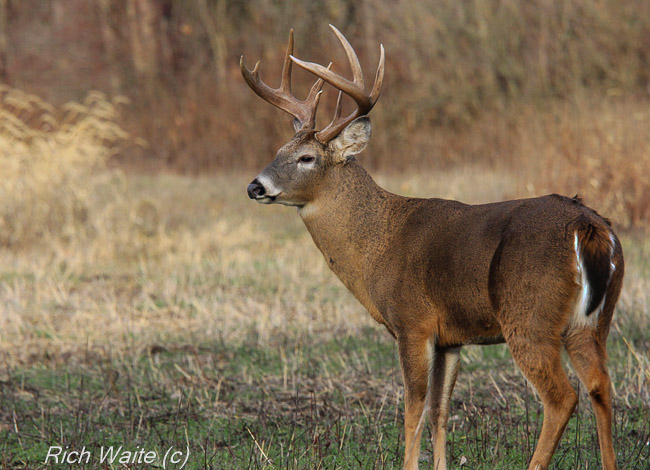
Iowa Youth Bowhunter Sets Record with “Junkyard” Buck!

Iowa Youth Bowhunter Sets Record with “Junkyard” Buck!

One look at the beast and you’ll see why they call him the “Junkyard” Buck.

I mean what else could you call such a giant whitetail?

The chase began back in October of 2015, on a small property deep in the
heart of southern Iowa’s big-buck country.

Doug Knott and his family had just acquired the small parcel (just under 30-acres).

They bought it for the hunting. But they will tell you that, even in Iowa, they weren’t

exactly planning on finding a GIANT that first year on that property.

“We moved the cameras around a bit and got our first picture of the beast on October 05, 2015”, says Doug.  “He was very impressive!”
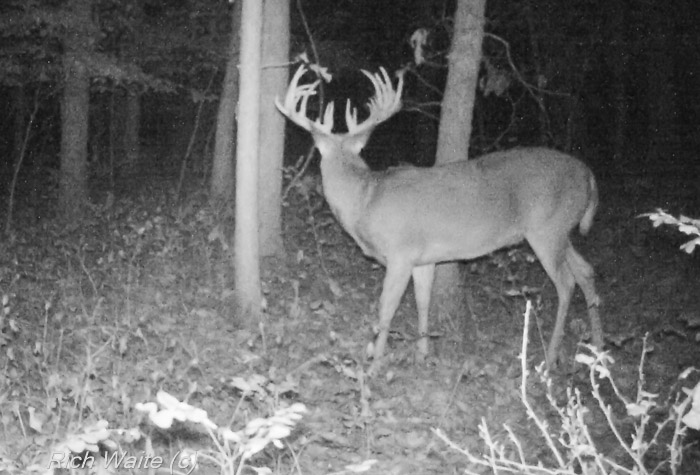
 

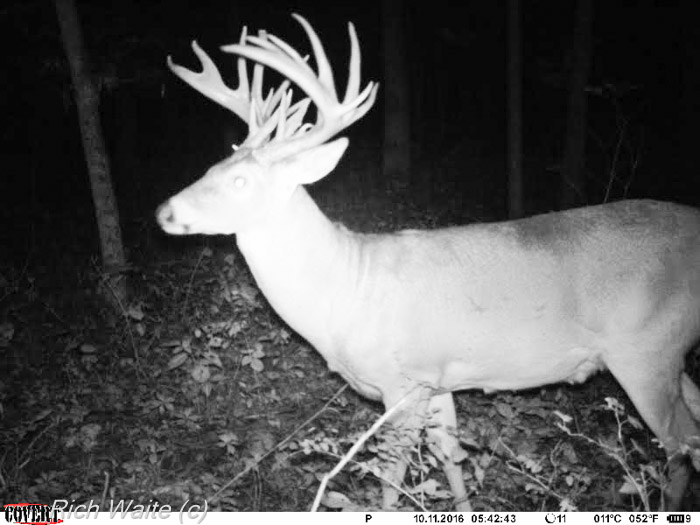
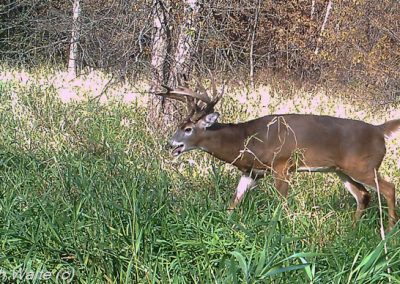
Here is a trail camera picture of the Iowa buck they call Junkyard.

This trail camera picture of “Junkyard” reveals how he got his name! He has “junk” everywhere on his head! This picture is from the fall of 2016 when he was 4.5 years old.


Doug continued, “As far as we could figure from a few trail camera pictures that fall, the buck had 18-points and would probably score somewhere in the 180’s”.

Text messages started flying around between family members and the name “Junkyard”  buck was justifiably given  — courtesy of their cousin Scott.

“I’ll tell you what —  the Junkyard buck quickly became an everyday mention among our family,” says Doug!

And the hunt for the “Junkyard” buck was on!

Thirteen-year-old Tyler and his father Doug were playing checkers with the buck.

They would get a picture right here and a picture somewhere over there of the buck throughout that first fall.


Trail camera image of the Junkyard buck harvested in Iowa.

Here is a trail camera shot of Junkyard in 2016.


“We were starting to get a feel for the places the buck would spend much of his time with the
aid of those trail camera pictures” said Doug.

Then, on October 27, 2015, the young hunter Tyler and his father Doug would BOTH have encounters with the Iowa monster buck they call Junkyard.

But both with Junkyard buck encounters were in very low light. Not good for taking a shot!

“Then, on November 01, 2015, Junkyard came past my stand nudging does,” said Doug.  “And I thought I made an easy shot”!

“Unfortunately, later we learned that my shot wasn’t so perfect,” continued Doug.  “We learned that a small limb near my stand was cut by my broadhead”.


And so it sometimes goes in bow hunting.


Even the smallest of obstruction between hunter and the hunted can turn what appears to be great luck into a bag of sour apples.

“There was a decent blood trail for 120 yards and then it just stopped”, said Doug of the shot.

“My son Tyler and I were BOTH sick about wounding the buck,” he continued. “However, we learned that Junkyard was still alive through various trail camera pictures of him again that started showing up just a week after that shot”.

“We saw Junkyard off and on during November and his condition pulled at our hearts,” mentions Doug.

“He was clearly hobbling on three legs, and he seemed disturbed by other bucks chasing does around his area,” Doug continued.

And Tyler says, “I watched Junkyard one time as he made a large circle, thrashing trees and making scrapes”.

And it turns out that Tyler came to full draw on the monster Iowa buck that day! But it was a straight-on, low-odds, shot. A shot that is very risky for a bow hunter to take.

A Mature Hunter


The monster Iowa buck was toying with a 13-year old, young man’s, nerves just standing there 15-yards distant!

“I held back and held back and finally had to slowly let down the string,” said Tyler of that encounter.

Resisting such temptation is no easy thing for any hunter – let alone a 13-year-old boy!

But as Tyler’s father Doug will say, “He is a very mature hunter”.

And I can attest to that, even with my limited observations and time spent around him — Tyler seems to have the maturity level of someone a decade or more to his elder.

And his Dad will tell you, too, that his son can shoot a bow (or a gun)!

“Tyler can sit there and shoot small groups into a circle at 50 or 60 yards with his bow”.

But, and back to the story now, having the monster buck of your dreams just standing there near
your tree for minutes on end is unnerving and a hard opportunity not to take – it’s a lot of tempting bait to refuse for any hunter, let alone a youth with limited first-hand experiences to draw upon.

“I ended up drawing back one last time,” quipped Tyler.

Unfortunately for Tyler, the bow’s limb hit something and the shot grazed off.

And the Junkyard buck finally decided that is was due time to get the heck out of Dodge!

And leave he did!  But not before accidentally stepping on Tyler’s carbon arrow, snapping it in half!


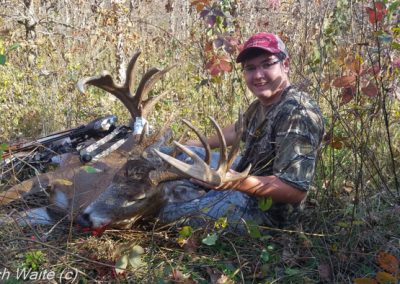
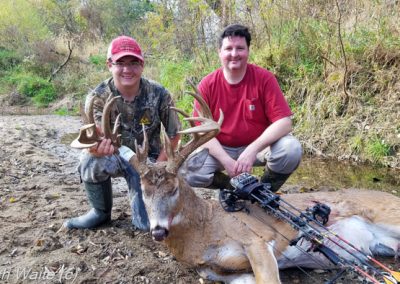
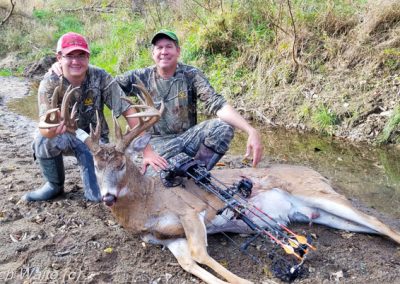
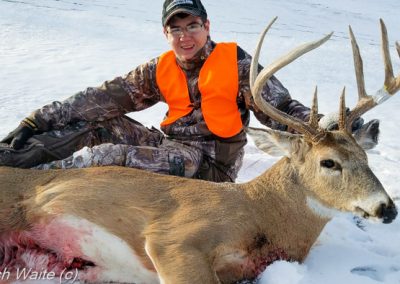
Picture of the buck they call Junkyard. An Iowa trophy buck harvested by a fourteen-year-old boy!

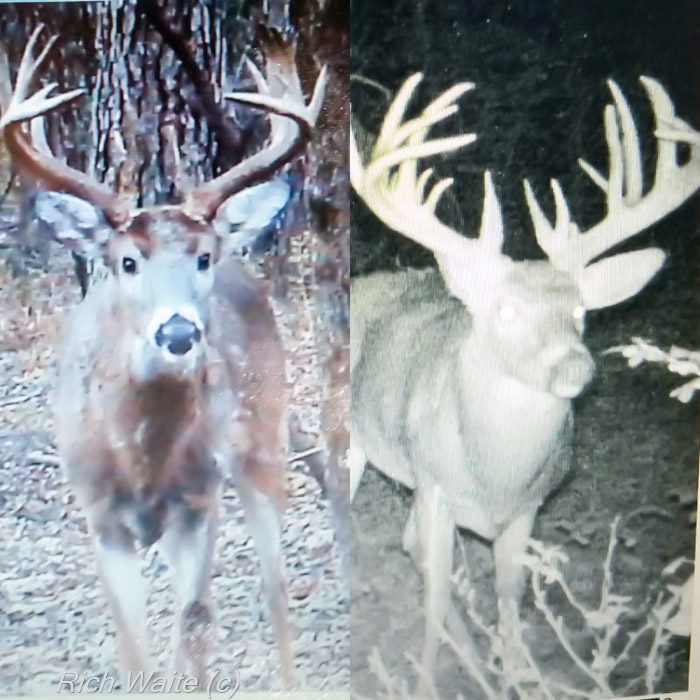
Here are trail camera images of “Junkyard” revealing how much difference just one year can make!


The Iowa Junkyard Buck Wins the first round


“We decided that we had our chances at the Iowa beast that year and that that was enough,” said Doug.

“We decided that we’d just let the beast roam that fall and take our chances if he would make it to the next season. We had our chances and he won”!

“So, continued Doug, we just decided to run cameras on video mode and get as much evidence of this buck as we could for the next year.”   “We crossed our fingers that he would make it to the next year”. (I would be crossing my toes too!)

But would he?

“We just didn’t know if the Junkyard buck was still healthy enough to make it through the winter or if some gun hunter would get him,” said Doug.

“We figured he was just 3.5 years old from our experience with seeing him both on camera and on the hoof. But he was looking ragged”.  “We just didn’t know if he would make it but we figured that he deserved a chance at that point so we didn’t go after him anymore that year.”

Only time will tell.


Amazingly enough, as time went on, evidence of the junkyard buck came in via trail cameras!

“We learned that Junkyard was indeed going to survive,” touted Doug!

“We got him on camera in early summer of 2016 and he looked as healthy as ever,”!  “He was heavy and robust”!

And before they knew it another bow season had rolled around.


And it was time for round two with Junkyard.


Doug and Tyler began “seeing” Junkyard fairly regularly via trail cameras starting on September 30, 2016.

And believe this or not, but Junkyard was captured on a trail camera standing right under one of their tree stands in broad daylight on that day of September the 30’th.  Which, oh by the way, just happened to be the same day that Tyler shot a different Iowa monster buck!   This big whitetail “only” scoring 165″!

Not bad, not bad at all!

That hunt took place during the Iowa youth season (and, well, is really a whole other story).

You see, it turns out that Tyler shot it while hunting out of a tin lean-to shanty sort of a deal.

A place the buck was using to bed in for protection on hot days.

Tyler and his dad waited for this buck inside the shanty for about 12 hours — Tyler studying for his home-school work while he waited nonetheless!

And the buck finally showed — and Tyler greeted it with a bang!


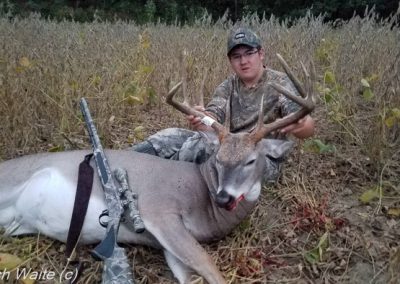
Picture of Tyler and his Iowa youth-season 165-inch buck.

Tyer and his 165″ inch Iowa “tin-shack” buck!


And it was a BIG buck — somewhere here or there around 165-inches!

But the buck wasn’t the Junkyard buck and Tyler still had a bow tag! (and a late muzzleloader
tag — and oh, by the way, Tyler shot another buck then too!  Why am I not surprised?)


October 31’st 2016 — The Big Day


“It was warm and muggy on my way into the place we call the “Rob Stand” said Tyler.

“It was just after 8 am. when I saw my first deer”.

It was a buck we called “Slim Jim” and he came right in over a creek crossing trail soon after I’d rattled!”

How big was Slim Jim?  Oh — 170 B & C-inches or so!

But it wasn’t the Junkyard Buck.

“We’d decided that we would only shoot Junkyard that year, so I let Slim Jim walk”, said Tyler.  “Slim Jim would have been my biggest bow kill but we were after the Junkyard buck.

Fourteen-years-old?  Mature hunter?  Dumb question!

This kid is solid as a rock!

Just after Slim Jim walked through Tyler’s shooting lane he caught movement out of the corner of his eye.

“It was Junkyard”, exclaimed Tyler!

And he was on the same trail that Slim Jim had just crossed the small creek on.

Face-Face!


Before Tyler knew it, he was face to face with the Iowa mega-giant monster buck of his dreams.

A buck he’d dreamed about many a night!

A buck he’d daydreamed about many a day!

And in just moments, the Junkyard buck had closed the distance to just 21-yards!

“I waited as calmly as possible for Junkyard to close the gap,” said Tyler.

As any bowhunters can attest things happen in a dreamy blur at that moment in time.  The moment of truth or consequences

when the bowhunter releases the arrow from the string.

“Just where did the shot hit the buck,” is always the ultimate question of critical importance at the moment of arrow impact on deer.

“It looked like a good hit but that it was probably a liver hit as well,” said Tyler.  “I watched the Junkyard buck bed down several times before eventually limping off”.

“The whole time Slim Jim stood at about 60 yards just watching things happen,” continued Tyler.

What to do…what to do?

When in doubt wait it out…is the old bowhunter adage that has more truth to it than some people may attest.

“We decided to wait several hours before ultimately making a grid search and finding the buck,” said Tyler.

It turned out that Junkyard had only gone about 200-yards.

“Throughout that whole process — from the time I saw Junkyard at that creek crossing until after we found him, it felt like a dream,” said Tyler. “I kept asking myself is this really happening”?  “Did I really just shoot Junkyard?!”

Yes, he did!

Boy wins round two!


So how big is Junkyard really?


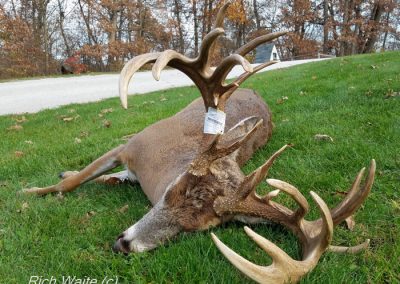
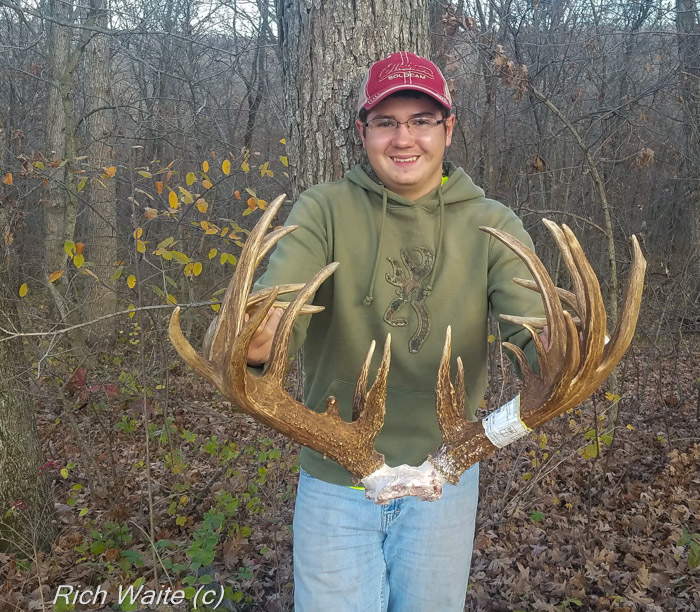
Picture of the Iowa giant buck they call Junkyard.

He’s pretty BIG indeed! Here Tyler hold up the antlers and skull plate of Junkyard!


“We decided to take him right up to the Pope and Young Headquarters in Chatfield, Minnesota, to
have him officially scored”, said Doug.

After the 60-mandatory drying period, the official score revealed a gross score of 226 6/8 inches
and a net score of 222 inches even!

The Iowa mega-giant buck has 21 scoreable points and tons of mass. The Iowa monster buck has over 60-inches of “Junk” in abnormal points!

What a buck – to say the least!

And before the fat lady could sing her last tune that season, Tyler downed another buck: this one
with the help of his trusty muzzleloader during Iowa’s late season!

Only in Iowa!  Perhaps.

Though, it wasn’t as big as either of his first two bucks that season it was a nice buck nonetheless.


Lots of antler inches!


It turns out that Tyler downed over 515-inches of whitetail antler during the 2016 Iowa deer hunting season!

And it turns out that Junkyard is the biggest whitetail buck ever taken by any youth of 15-years or younger in anywhere in the world with a bow!

Not bad, one might say (of course, sarcastically to the n’th degree).   Not bad at all!

But Doug AND Tyler are both as humble as ever and will tell you that they did nothing to deserve
the opportunity to harvest such a beast of a whitetail.

(Well, I’m thinking they must be doing something right and that whatever it is they are doing they
may not want to stop. Good Karma is nice to have following you around).

Interestingly enough, Doug had an age test done on Junkyard so they could pinpoint the buck’s using the
latest technology and most accurate method possible.

It’s forensic aging using the cementum annuli method and it’s very accurate!

It turns out the Iowa monster buck that has come to be known as Junkyard was just 4.5 years old!

A truly amazing Iowa whitetail!

A truly amazing anywhere whitetail!

But mostly – A truly amazing young hunter named Tyler!
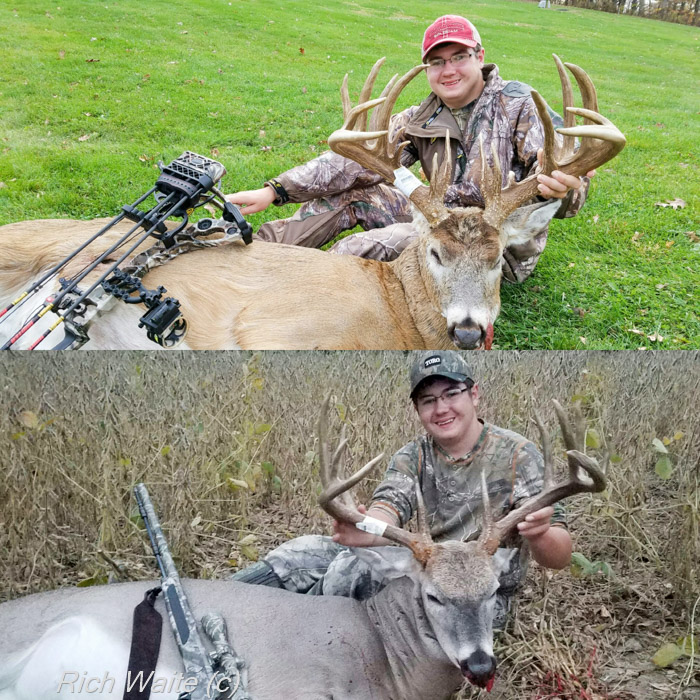
 

Record Iowa whitetail called Junkyard, top image. Tyler poses with the other buck he shot in 2016 in Iowa too!

Here’s a picture of 14-year old Tyler with Junkyard. Oh, and the 165″ buck he happened to shoot that same fall out of a tin-shack!


k

Note: All Photographs courtesy of Doug and Tyler Knott. Copyright 2016 -- All Rights Reserved.

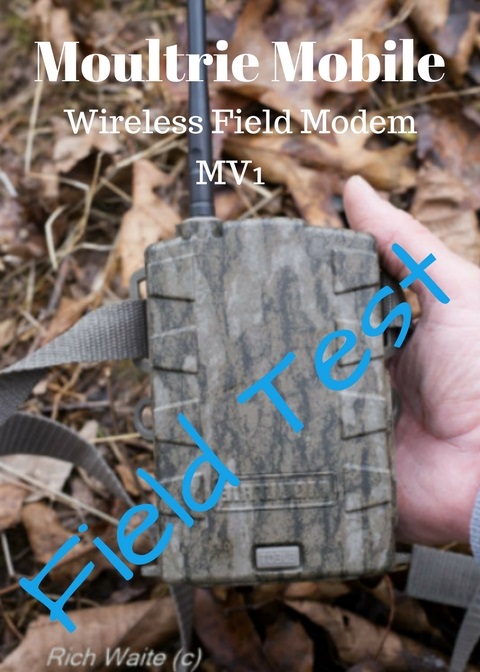
Moultrie Mobile Wireless Field Modem MV1 (Field Review)

Moultrie Mobile Wireless Field Modem MV1 (Field Review)

The Quick Low-Down:


Final Analysis:  The Moultrie Mobile Wireless Field Modem MV1 did very well overall in our 12-week, real-world field test.  We give the unit an 8 out of 10.

It’s only real weakness was a rather cheesy design for securing it with a Python-type cable (but we feel no matter what you do, a thief who really wanted something strapped to a tree is going to get it).

Battery life was good, and we have little doubt that it would have been better had we used the suggested lithium batteries.

The fact that every modem needs it’s own data account with Verizon means that it could get rather costly if you added very many of these units to your field-scouting arsenal, as well.  (Just something to keep in mind).

The real question to us is this:  would we buy another one of these units?  (We aren’t given these units, we buy them with our own cold-hard cash).  And the answer is a resounding YES!   These units revolutionize the way you scout using trail cameras.  And we believe the wireless design is the future of trail cameras.  I plan on picking up at least a couple more for next season.  They keep you from scaring animals because you don’t have to barge in periodically to pull memory cards.  And, perhaps most important, they let you hunt what is currently happening instead of what has happened!  This means you can sneak in and hunt stands that are hot right at that very minute!  A HUGE advantage for sure and one that we have taken advantage of ourselves.


The Test:

The Moultrie Mobile Wireless Field Modem MV1 is used to connect to a suitable Moultrie camera so that images from the camera can be transmitted electronically to be viewed on a desktop computer or mobile device.

The camera takes the picture and, presto, the picture is pretty much immediately visible on the device!

But does Moultrie wireless modem work?

That is the question.


Pros:

The Moultrie Mobile Wireless Field Modem is small and lightweight at 18 ¾ ounces or 1.17 pounds (with a full set of 8-AA batteries according to my digital kitchen scale) (easy to transport)

The modem measures: 3.5 x 5.5 x 1 ¾ inches (roughly)

image of Moultrie wireless field modem.

The Moultrie wireless field modem with the Moultrie 888i mini game camera -- all in one hand.

The Moultrie wireless modem is small. Here is in my hand with the Moultrie 888i mini game camera that I used as well.


A free Application is available for Android and Apple devices. The app. Lets you do everything you can on your desktop computer as far as seeing photos and controlling your camera goes.

The wireless modem appears to be well made and was reliably weatherproof in 12-weeks of field use.  (I used the wireless modem in a variety of weather conditions, from 90-degrees Fahrenheit down to -10 zero, along with heavy rains and snowy conditions)

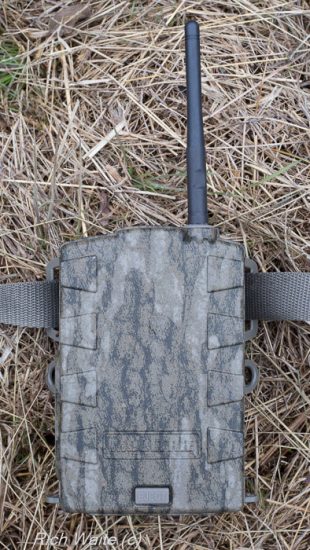
A picture of the Moultrie wireless modem.

The Moultrie wireless modem has rubberized gaskets around the connections to help seal it from fowl weather.


Despite the camera I choose to run with the wireless modem needing a  firmware upgrade, it was still a very straightforward and easy setup.  Moultrie states that you must make sure the camera you choose to use with the modem has the necessary updates — so this step is critical!

The unit did better than I expected with battery life.

The modem didn’t chew through them that bad at all, despite me not even using the recommended Energizer or lithium batteries.

I used Duracell batteries initially because that is what I had. I replaced the Duracell Quantum batteries when they were only down to about 60% just because I was in the area and didn’t then and didn’t know when I would be in the area again or how fast they would go down from there.

I replaced those batteries with Rayovac High-Energy.   Again, because those is what I happened to have with me.

I didn’t expect much from these batteries, to be honest. However, they did very well and accounted for a solid 6-weeks of performance and more than 2,000 photos in some very cold and nasty Iowa winter weather conditions (several days below zero). The Duracell Quantum batteries did well too and lasted 6-7 weeks and accounted for about 1500 photos (the weather during this period was mostly mild and in the 45-90 degree Fahrenheit range).

How much better would this unit have done in a less extreme environment and with the recommended lithium batteries?

The modem was easy to hang on a tree with the included nylon strap. Although the plastic strap-clasp left something to be desired, at least upon first glance, it actually worked well and was easy to use. The strap had plenty of length and according to my trusty tape measure should go around a 23” diameter tree with about 1” inch to spare.

Close-up view of the plastic clasp on the strap of the Moultrie wireless modem.

The plastic clasp on the nylon strap of the Moultrie Mobile Wireless Modem MV1


A picture of the Moultrie wireless modem, showing the nylon strap.


The wireless modem does have holes along the side for which one could use a locking cable in some effort to secure it to a tree from theft. However, the unit, like all units on the market that I am aware of, is made of plastic. Even a stupid and/or lazy thief would not have much problem stealing such a unit, if he/she wanted to.

The Moultrie wireless modem connected fast to the Verizon 3G data network that it must use.  (The Moultrie wireless modem must run on Verizon and uses no other carrier at the moment)

Picture of the Moultrie wireless modem side view.

Status level indicators along the side of the unit tell battery supply levels and data connection strength. The on and off button is right there as well.


In my area, Verizon works pretty well. But, you need to check the coverage map to see if Verizon has good coverage in your area. Moultrie suggests having at least three bars of strength showing on the unit itself for good results with the Moultrie wireless modem.

The Moultrie wireless modem is separate from the camera itself.  Although not a feature in any way of product quality or build, this could be a handy and cost-saving feature if you happen to already have at least one Moultrie camera that is 2015 or newer.  (Note: “A” series cameras have limited functionality with the Moultrie Mobile system according to company data).

Also, whenever the modem decides to quit working, someday, who knows when, it should be cheaper to replace just the modem than a competitors unit that may have the camera and modem combined as one, such as the Covert Special Ops Code Black or Spartan HD Go Cam (I have zero experience with either of these).

Of course, the camera would quit working some time too. But with a combined unit, one would need to replace the whole thing — meaning both the camera and the modem, if either one would go out.

Cons:

I didn’t really find any problems with using the Moultrie wireless modem. Moultrie acknowledged that they did have some problems with their website but they fixed that issue right away.

The holes to run a “Python” or similar cable locking device around the wireless modem are plastic – easy for someone to steal this unit if they really wanted to. (This is not unlike most every other unit I have seen though)

The Moultrie wireless modem is mass produced in China. Is this good or bad?

And every other unit – but those from Buckeye – are as well.


The story of the test:


Note: As we already mentioned, The Moultrie Mobile Wireless Field Modem MV1 works exclusively with Verizon’s 3G data network. So, be sure you have coverage from them before purchasing this system (see map below).

Verizon area coverage map for needed to use with the Moultrie wireless modem.

My Experience with Wireless cameras


For nearly 10 years, I’ve used wireless cameras in the field and have long understood their advantages for hunting. Simply put, they tell you what is happening NOW not just what has happened IN THE PAST.

This is a major advantage of a wireless camera system!

If you see a big buck working a scrape at 2 pm on November 02, for example, then perhaps you can sneak into a stand just down the ridge and intercept that buck.

Or, maybe, just that piece of information will help decide for you better of what could have been a “coin flip” sort of decision over where and of which stand to hunt that evening.  Now, you will go where you just saw a big buck on your camera!

You simply do not get this sort of instant information from a “traditional” trail camera setup.

This is a clear advantage with an “instant” or “wireless” trail camera setup. In fact, I’ve used this sort of instant information myself to harvest a big buck on more than one occasion, over the years!

Another huge advantage with a wireless trail camera system is that you don’t have to traipse through the woods every so often to check your camera. This not only disturbs the very game that you are after but it is extra time and effort on your part as well (which usually equates to extra money too)!

With a wireless trail camera setup, you no longer do you have to drive down to the farm, spending time and money on gas and whatever else along the way, just to check your trail cameras. Now, the pictures are delivered right to your email inbox, or via text, just seconds after being taken!

Talk about convenience and a great money saving advantage in the long run!  This really is it.


The future of game cameras:


I’ve been using wireless cameras for years now but not this type.

I had always used the Buckeye Orion system.

The Buckeye system has been near bulletproof for me, too.  I have two of these cameras setups running pretty much 365-days per year and they work 24/7 for me. I rig them with a solar panel and the only time I touch them is every year or two when one of the $35 batteries decides that it will no longer take a charge. That’s it. And, no, I’m not kidding!  I have no experience with the new, and less expensive, X series of cameras that Buckeye is selling.

The built-in-Ohio Buckeye system has been very reliable for me (and they have top-notch customer service, although, I’ve found that I hardly ever need to use it because their cameras just keep working). However, the Orion system that I’ve always used is expensive and, since I used their computer-based system, my cameras need to be within a mile or so of the base station, which is attached to my computer (the company claims up to a 2-mile range and that may be true over open areas but that is not realistic in the rolling woods where I hunt. I know. I’ve tried to extend the range).

So, I use the Buckeye system on my home farm. But on other farms, where I don’t have a computer within a mile of the cameras I place, I need another system. Buckeye has one.  Bu,t their cell-based system is costly and a beast of a system to set up (I know, I’ve set them up).

I’ve been waiting for a cheaper and easier wireless camera alternative.

A small and a highly portable alternative.

I knew the technology existed so where was it?  How come no one seems to be using this technology?

I waited.

And I waited.

And, finally, someone seems to have delivered an answer.

Or did they?


Does Moultrie have the answer with their new Moultrie MV1 Field Modem?


In October of 2016 I decided to purchase one and find out.

I ordered one from Amazon and a few days later I found myself holding a new Moultrie Mobile Wireless Field Modem MV1 (say that 100 times fast!)

And since the Moultrie wireless modem connects to a camera to pull the images from – I knew I needed a camera as well.

I did a little bit of reading up on them and I found several people using the M-888i mini game camera with good results, so I bit the bullet and ordered one of those as well.

After all, I did need a camera to use with the modem. I had a several older Moultrie cameras but the new wireless modem system only works with Moultrie cameras of 2015 and newer.  (It turns out that I am REALLY happy with this camera!  It has been flawless so far and the battery life and image quality have proven excellent as well).

I spent $199.99 for my Moultrie Mobile Wireless Field Modem MV1
And then I spent $148 for the Moultrie M-888i mini game camera.

In total, I spent $347.99 to create a system that, on paper, looks to be very impressive. I could have spent less and gone with a cheaper Moultrie camera than is the 888-i mini. I went with this one because it looked to be a solid camera as far as features go: having 14-megapixel resolution, a 0.7 second trigger speed, a claimed long battery life, and last but certainly not least – and a really BIG feature to me – is that it also has invisible night-time IR.

I thought this camera and this wireless modem should combine to make a really killer combination in the field.


How does it work?


After registering my modem with Moultrie, I was instructed to ensure that my camera had all the latest firmware updates.

You’ll need to be sure that you have fresh AA batteries for your camera and for your field modem (they each take eight AA’s). Moultrie suggests using Lithium or Energizer batteries. Well, I had Duracell Quantum batteries, in my “battery drawer” at home, for some strange reason, so that’s what I put into the modem for its first test run.

Picture of Moultrie mobile modem showing batteries.I was pretty sure that the recommended lithium batteries would probably be best – especially in super cold weather or when ultimate long battery life is desired.  But they are quite a bit more expensive and I would be running my camera close to home and in pretty mild temperatures, at least initially. So, I figured that if the modem ate through my batteries really fast I would be able to change them out pretty easily anyway.  No big deal.

I realized, though, that since lithium batteries were recommended my Moultrie wireless modem might not even work correctly without them.

However, I thought I would just give them a shot anyway.  After all, I had nothing to lose.

You’ll also need a good SD card for the camera.

And one KEY thing I found out, too, is that your camera must have taken at least one picture in it’s “lifetime” before it will work with the modem. That’s really weird, I thought when I read that.  But, okay, easy enough, so I waved my hand in front of the camera and completed that mission.


The camera needed an update


My camera needed an update, according to the Moultrie website, even though it was brand-spanking new.

But, I found out, that this was no big deal. I just followed the directions on the website.

I downloaded the updates onto an SD card and placed the card into my camera. From there, the camera installed the updates with a flip of a switch.

Again, no problem.


Select Data Plan


The next thing to do was to select the data plan, from Verizon, that I desired:

Picture of Verizon data plan to use with the Moultrie wireless modem.

I really wasn’t sure where I was even going to place the camera yet – on a trail, fence crossing, or maybe over a scrape? I might even place it over a small food plot where I could get lots of pictures of deer in a very short amount of time. For this reason, I selected the large data plan for $19.99/month.  (And I found out that this plan was plenty large enough for the photos that were taken over the course of the test).


Setting it up in the field


Next, I simply went out to the field and found a spot to hang the camera and associated field modem. I ended up finding an area adjacent to a small field.


Image of Moultrie Mobile wireless modem and Moultrie 888i Mini game camera on a tree.

The Moultrie Mobile Wireless Field Modem MV1 uses a 30- inch heavy-duty USB cord to connect to a suitable Moultrie camera. The cord has rubberized ends to effectively seal out the weather.


I strapped the camera to the tree and then placed the Moultrie Mobile Wireless Field Modem MV1 on the tree just above the camera. I then connected the two with the heavy-duty USB cable that came with the Moultrie wireless Modem. I turned on the camera and then the wireless modem and. ..voila!

Everything seemed to be working! (press the “test” button on the right side of the modem to turn it on. The Moultrie wireless modem has various status level indicators showing connectivity to the data server, to the camera, and a battery strength level, indicator).

To be honest, that’s pretty much it! (And this may all sound like a lot but in reality, it wasn’t hard at all to get the system up and running and in short order).

The camera and Moultrie wireless modem sat there, strapped to that little shingle oak tree, for a few months and kept up their end of the promise – delivering me nice images straight to my web page account with Moultrie (you get this page when you initially register the modem with Moultrie. It’s where you log in to view your photos and make adjustments to your camera system and modem).

Now, from my computer – or mobile device – I can do and see all sorts of things relating to my camera and Moultrie wireless modem. Things like adjusting detection delay times, PIR sensitivity level, time lapse on/off times, as well as the resolution of the photo and various other things.

It really IS amazing!

I can be sitting in my tree stand and check photos that came into my email just seconds earlier from a camera just around the corner! Or, perhaps, from a camera across the country that I decided to put on the system!


Picture of Moultrie wireless modem computer screenshot setting view.

Here is a view of the Moultrie website where you can see all sorts of details regarding your modem and camera signal.


Picture of Moultrie wireless modem settings screenshot.

You can see how much control you have remotely. Right from the web page, you can adjust most functions of your camera remotely.


How’s that for convenience?


Is it reliable?


I was expecting problems, to be honest.

But the system was near bulletproof for me, during the nearly 12 week test period.

Actually, the system WAS bulletproof, for me.

I did receive a notice from Moultrie in early January, via email.  They apologized because they were experiencing some issues with their website. However, I didn’t notice an issue with this. And less than a day later, I received an email from Moultrie stating that they were happy to report that the website issue had been resolved.

I was doing some work in the area of the test camera in early December and noticed that the Duracell Quantum batteries that I had originally placed in the modem were down to about 60% (this was after 6-7 weeks and 1200 photos or so). Not knowing how fast they would then drop down to zero percent in the colder temperatures that were moving in, or when I’d have another easy chance to replace batteries, I decided to put in some new ones. So I put in the only batteries that I had, which happened to be Rayovac High Energy.

Were they really High Energy?

I had my doubts about those batteries working very well or for very long in the COLD temperatures that we were starting to have.  But to my surprise, these batteries did really well and lasted until January 23.  So, they lasted 5-6 weeks and were good for about 2,000 photos. I was pretty happy with these results, especially considering that we had some very cold days during this period, including some sub-zero temperatures, and that they weren’t even the recommended lithium batteries.

Despite the cold and the snow and the down-pouring Iowa rains that we experienced during the time that I ran the Moultrie Mobile Wireless Field Modem MV1, the unit performed to near perfection.


Photo of the Moultrie wireless modem.

I found the Moultrie wireless modem made good tight connections with the supplied heavy-duty USB connection cord.


In fact, I would say that the unit performed beyond my expectations.

The Moultrie wireless modem just worked and it delivered what was promised.  It did this 100% of the time during my test period.


Picture of the antenae of the Moultrie wireless modem.

The short antenna screws on and off.


I haven’t talked about the images from this setup for a reason.

That’s because you can use many different cameras with the Moultrie Wireless Field Modem MV1.   Thus, you can have many different levels of camera picture/resolution quality, depending upon the camera you decide to use.  So pictures you get from this system will, no doubt, be dependent upon which Moultrie camera you elect to use and what resolution you have it set to.


Image of Iowa whitetail buck taken with the Moultrie wireless modem.

An image of an Iowa whitetail buck. I selected a medium resolution with my camera settings most of the time. This seemed like all the resolution that was necessary to field inspect whitetails.


Picture of red fox taken with the aid of the Moultrie wireless modem.

Image of a red fox. I played around with my camera’s settings on the Moultrie website access control panel. It is easy to change such things such as image resolution, PIR sensitivity, timelapse, capture modes, etc., all from your computer at home or mobile device!


Picture of an Iowa whitetail buck taken with the aid of the Moultrie wireless field modem.

I was happy using a medium resolution setting with the Moultrie 888-i mini game camera that I used. One can request high-resolution images from Moultrie any time. There is no additional expense for high-resolution images but it does add to the amount of data that comes from the plan that you choose.


Picture of an Iowa whitetail doe taken with the help of the Moultrie wireless field modem.

Image of an Iowa whitetail taken with the help of the Moultrie Wireless Field Modem.


I can tell you this: The Moultrie 888-i mini Game Camera that I used delivered high-quality images.  The images had a high degree of dynamic and tonal range as well as crispness and overall image “pop”. I didn’t expect anything more, especially from a trail camera.

No, you probably won’t get cover material for National Geographic via your Moultrie wireless modem.  But you’ll be able to impress yourself or your friends with some great images of deer and other critters that your system catches day or night. I was, and still am, more than pleased with both the modem and the camera!

Of course, there are other wireless trail camera systems on the market now, too. It seems like this segment of the market sort of took off the last couple of years.

What about those?

Browning makes a camera with a built-in modem, for instance. I’ve heard some good things about this unit. I thought about getting this unit instead of the Moultrie at first. But after I found out that the Browning uses AT&T, I knew I couldn’t go that route.

In my area of southern Iowa, AT&T service is right next to being non-functional. I had to have a unit that relied upon either U.S. Cellular or Verizon.  Those being the only two companies that really had reliable signals in my region.

So one key thing to ask yourself is “what is the best service provider in the area I’m going to put my camera”?  You have to have at least decent coverage for a system to work.

Another reason I choose the Moultrie Mobile wireless modem over a different make is that the other companies all seemed to have their modem built right in with the camera – as an “all-in-one” unit.  (Such as those from Spartan and Covert).

And maybe this seems like a good, or even better, idea at first.

But, after thinking about it, I figured it might be better to have a $200 modem vs? amount more with a camera/modem combination all-in-one setup.  I mean these things are going to break or just quit working sometime, right?

And when they do?

I’d rather be replacing a $200 modem than whatever more it may cost to replace both the camera and the modem as I would have to do given a different unit (even if only one component goes faulty).  So I wouldn’t be hit in the pocketbook quite as hard or all at once anyway with the Moultrie.

And, I like the way the Moultrie wireless modem can be used with any 2015 or newer trail camera, too — instead of just some camera that the modem is built around.

It just seems the Moultrie wireless modem is a bit more adaptive in that regard with different cameras that I may end up with over time.

We will see how the Moultrie Mobile Wireless Field Modem MV1 holds up.

Only time will tell.

But so far, so good!


Moultrie Mobile Field Modem MV1 (Amazon)

Moultrie Mobile Field Modem MV1 is available at AmazonPicture of the Moultrie wireless modem.

Calling All Iowa Coyotes

Calling All Iowa Coyotes


An old friend from eastern Iowa called me, “We really had a great hunt this morning”, he said excitedly. “We set up on a big open ridge and howled at first light,”

He continued on, “Within minutes a coyote howled back seconds and seconds later two coyotes sprinted right at us, full-bore”.  Geez, I said.  Incredible!

“It was definitely exciting, and we got really lucky, my friend continued on, when they both slammed on the breaks at about 80 yards. They stopped just long enough to get off a couple of shots and we got them both”!

Wow, what a hunt!

Of course, a story having such an outcome doesn’t always happen when calling Iowa coyotes. But it does happen, and fairly routinely.

In fact, some sort of action typically unfolds every other setup or so. As long as the hunter is careful and set up correctly, that is.  And, of course, so long as a hunter is in good coyote country and is calling at the right time of day (and year).  (I’m not saying this is always easy).

An absolute key is, to face into the wind with each setup.  A coyote’s nose always knows —  so fooling a coyote’s nose is the first step in calling one to you.

What sort of call?

I like to use an electric caller.

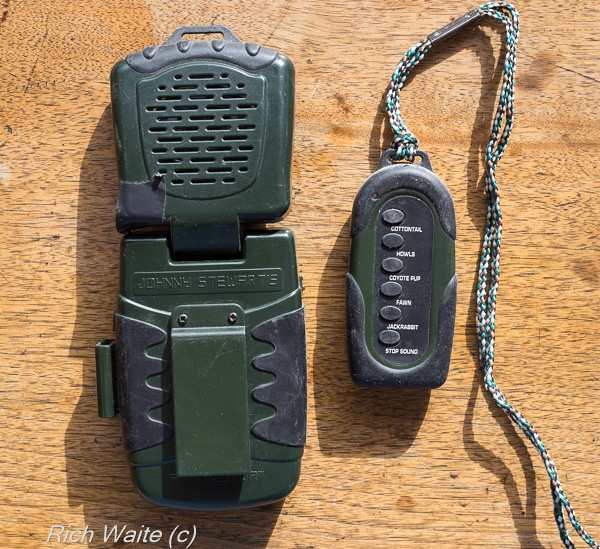
I’ve had excellent results with the Hunter’s Specialties Johnny Stewart predator call (about $35 — it’s a steal). The range for the remote on this goes out to about 50- yards — which is long enough (just barely) and the call has 5 pre-programmed sounds. (They still make this call, I believe, but I think it has been upgraded since I’ve bought mine). This call may be inexpensive but I’ve called in several coyotes and foxes with mine (and even a couple of bobcats). I’ve had mine for several years and it just keeps working.  It’s great for “running and gunning” because it is super light-weight and fits easily right in your pocket.

The Hunter's Specialties Johnny Stewart Predator call. I've called in several Iowa coyotes using this little call!

This little electronic call from Johnny Stewart is inexpensive — about $30 — but it has shown that sure can call in coyotes and other predators.


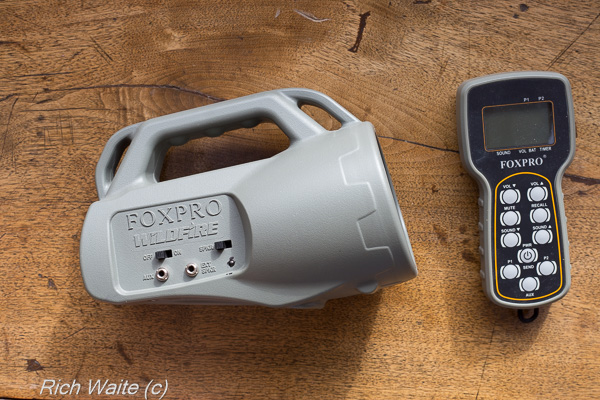
However, I also employ a more expensive, and louder, FoxPro Wildfire electronic caller (I don’t believe they make this exact model any longer.  I believe the FoxPro Inferno is a newer and more upgraded version — it comes with 75 sounds built-in and you can download up to 200 sounds total onto this unit from the FoxPro web site).

FoxPro, and other call manufacturers, often tout how many different sounds their callers can produce and be can be programmed for. But to be honest, you only need a few different sounds to call in an Iowa coyote.  But, there is no doubt that the FoxPro and other electronic calls on the market are truly fantastic for calling in predators!  A big advantage with these units over the little Johnny Stewart caller previously mentioned is that they are much louder which is great in the wind!  They can also be used with an auxiliary speaker as well to make them even louder.  Plus, their remotes usually operate at a longer range too.

Picture of the FoxPro Wildfire caller. This call can be dialed up pretty loud, which can really help call in an Iowa coyote when the wind is howling!

FoxPro makes some great and sophisticated calls. This is one of their older and more basic models but it works very well in all conditions and is plenty loud enough for most situations.


The various prey-in-distress sounds of the: cottontail, jackrabbit, squirrel, and fawn.  Plus, a few different howls are the calls that are generally used to call in an Iowa “song dog”.   And that’s it. You don’t need a call that is capable of producing 100’s of sounds to call in coyotes, that’s for sure.  (But they sure are nice!)

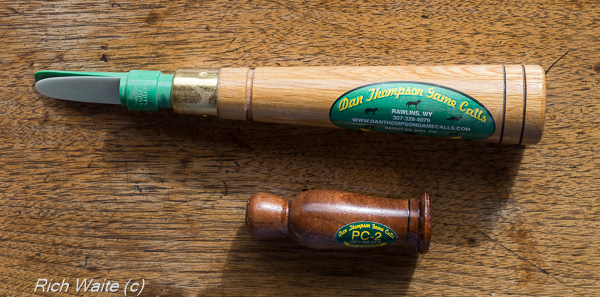
I’ve called in lots of coyotes with a traditional mouth-blown call.  The various calls that Primos and Dan Thompson put out are usually great.   I really like the Dan Thompson PC-2 for squealing just like a rabbit!


A picture showing two coyote mouth blown calls -- either of which is a good tool for calling in an Iowa coyote.

Mouth-blown calls like the howler — above — and the rabbit-in-distress — below — work well. Their major downside is that predators like to circle downwind and they may pick you off as the source of the sound before you can get a shot.


I like to set up 40-80 yards downwind of the actual call (depending upon the terrain – the thicker the cover is, the closer you’ll need to set-up so that you can see what is happening).

Being able to set up some distance away from that actual call itself is the real advantage of the electronic caller vs. use a traditional hand-held caller. Nearly every predator that comes into a call is going to circle downwind of it – they don’t always do this but they most often do.

So if you are camped out right on top of your caller you may be busted by the nose of the coyote before you can get a shot.

I typically set up my speaker in an open area – so any coyote approaching can see it from quite a ways off. They don’t know what it is from a distance and I think they assume it’s the dying rabbit that they think they hear screaming. I’ve never seen where a coyote spooks from it even at close range and it seems to draw them in out of curiosity – they may think it’s a funny looking rabbit sitting there but it’s about the same size and it seems to me like they believe that is what it is.  I’ve had bobcats come right up and sit next to the call!

When is a good time to hunt Iowa coyotes?

Well, as far as time of year goes, now is a great time.

Coyotes breed in the wintertime, in Iowa, and become responsive to various sorts of howl calls.

Sometimes a coyote will howl back when you howl with your call and sometimes they just sort of come sneaking in. You just never now and so you have to always be ready the moment you start calling!

You can try howling to see if that works first. Sometimes it does. Sometimes it doesn’t. Lots of guys swear by it. It does work but I think having luck with howling is very dependent upon the particular mood they are in during the immediate breeding season.

I’ve found that I’ve had my best luck, however, with a cottontail rabbit in distress call. In my area, rabbits are numerous and the coyotes seem to really key on them as food items of choice. It seems like the success of the rabbit-in-distress call has a direct relationship with the snow and the cold – the worse the weather the better that sort of call works. So don’t let the snow and the cold stop you. That is the best time to go call in a coyote!

But you don’t want to over-call!

In each spot, I’ll call one sequence of calls every 10 minutes or so until I elect to move onto a new location (often calling progressively loader each time).

Best times to hunt are early and late and even at night (full-moon conditions). It’s totally possible to have some great hunts all day long, especially during the winter coyote breeding season and/or when food is sparse.

I’ve found that giving each spot 45-minutes or so is about right. Sometimes, a nearby coyote will come right in when it hears the call and sometimes it seems to take them a while.

New Calling Locations:

When you setup each time, it’s important to get quite a ways away from your previous spot. I try to go at least as far as I think the noise coming out of my call speaker is going!  How far is that? Your guess is as good as mine. Who really knows. Coyotes can hear so much better than we can, so that’s always just a guess.

A key, though, seems to be covering lots of ground with your calling and not over-calling any one area. Iowa coyotes often range huge areas – especially when food is sparse (up to several thousand acres). And, coyotes are cagey smart. If you call one in, or group of them, and mess up, you can plan on calling them in again to be that much harder.

Iowa coyotes — like coyotes everywhere –get wise and get wise quick!  The best bet with calling is to move around widely and cover lots of new areas to avoid educating the coyotes in any one spot.

With each set-up, make sure the wind is as much in your face as possible. And, you will want head-to-toe camo. Being statue-still is paramount when calling as a coyote – or a bobcat or fox – may be silently sneaking in and eying your location.

What gun to use?

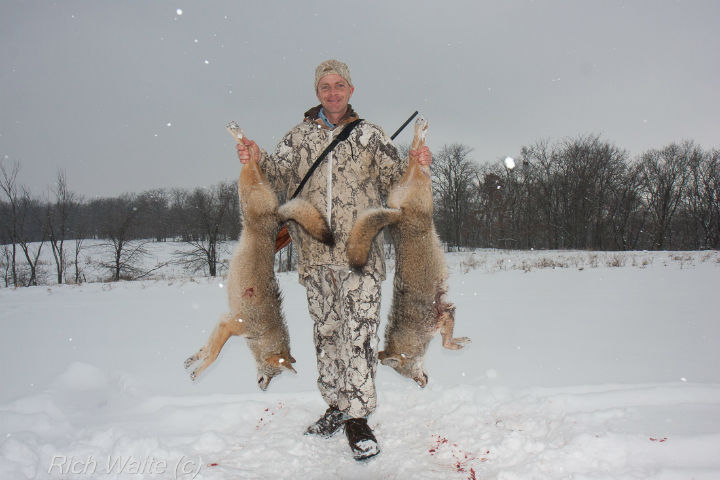
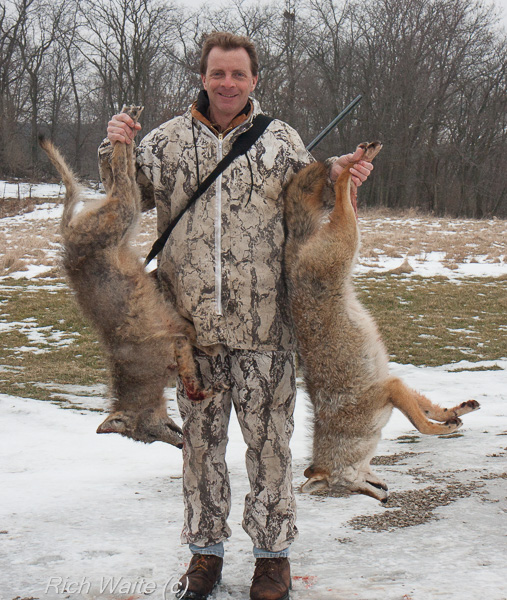
Picture of a successful coyote hunt.

A couple of “song dogs” I shot with my trusty .223 a while back. Notice how mangy the one on the left looks!


Anything you want really. A .17, .204 Ruger, .223 Remington, .22-250 Remington, .220 Swift, .243 etc., etc. There are allot or great choices out there and the choice is yours. I shoot a .223 – mainly because that is what I have. It does work well, though. Some folks use a 12 gauge shotgun, armed with buckshot. This would be a good choice for close-in shooting in thick cover where shots could be quick.

Why hunt coyotes?

Some hunters may feel like they are doing their deer herd the grandest of favors when they shoot a coyote.

And while there is no doubt that coyotes do eat fawns and sometimes packs of coyotes may even overcome healthy deer – especially in deep snow conditions where deer may be less mobile – shooting a coyote or two doesn’t really do that much to help the deer herd.  In fact, it probably doesn’t help herd numbers at all long-term.

I recall a college professor in a wildlife management class speaking of coyote population biology and how coyotes populations tend to be cyclical in response to the cyclical nature of rabbit populations.

It turns out that as rabbit numbers build….so, too, do coyote numbers. This continues on over a typical 10-year rabbit population cycle before rabbit populations ultimately crash back to the bottom again – at which point they start right back building up numbers again. However, coyote populations are still high when the rabbit populations crash at the end of their typical 10-year cycle. And those coyotes get hungry because of reduced prey numbers then. So we tend to see them more often roaming during daylight hours during these seasons of higher coyote numbers but lower prey numbers.

Coyotes have built-in adaptive mechanism that enables them to dwindle and shift their population as prey numbers dwindle and shift their population levels.

Something that is pretty interesting, too, is that whenever humans pressure the coyote population, the coyote population tends to increase not decrease.

Coyotes have an interesting trait whereby they increase the size of their litters from an average of 5 or 6 to as many as a 12-16 pups, whenever the human population puts any kind of pressure on their population. Also, when coyote howls are not answered by other coyotes during the breeding season, female coyotes somehow are innately triggered to produce larger litters that year. It is clear that coyotes have an adaptive trait that enables them to survive – maybe even better – when humans put pressure on them. We can reduce coyote numbers by 70% and by the next summer the population will be right back to the original number!  (1)

But just because we can’t ultimately dictate the long-term population level of coyotes and deer herd numbers, by hunting coyotes – doesn’t mean that we, as hunters, can’t make some short-term benefits in regard to our local deer herd by shooting a coyote or two.  By taking a few coyotes we are most likely lowering the stress level of the local deer herd that year by way of reducing the number of stressful deer/coyote interactions. This is a good thing.

Now is the time for some super exciting coyote calling action!  Iowa has plenty of coyotes and calling them in makes for a super exciting hunt!


What do you do with a coyote after you shoot it?

Pick it up.

Bring it home.

Skin it.

Tan the hide and hang it on your den wall.

Or, get it mounted (they make gorgeous trophies – WOW! )

Another option is to take the whole coyote into the nearest fur dealer: they might give you a few dollars for it whole or they might not. You have a better chance of selling it if you skin it and take it in: expect to get anywhere from $10-$35.


Reference:

1). How the Most Hated animal in America Outwitted us All (By Simon Worrall; Book talk, National Geographic)
PUBLISHED AUGUST 7, 2016

Hunting Iowa Wildlife with a Camera

Hunting Iowa Wildlife with a Camera

The early morning rays of sunlight sprinkling through the oak and hickory treetops began to reveal what it was that I had been straining to see.  Straining to see for the last half hour or so. Noise in the dark thicket of young oaks and bitternut hickory pole timber only about 60- yards distant.  Faint noise. Muffled noise. Hunters know the sound. Leaves stirring faintly by multiple footsteps, moving with a rhythm and a seemingly steady purpose, yet always circling back to where they started. Deer moving and milling about the thicket after coming back from the nearby grain fields.

That was my guess anyway. But was it two deer?  Three deer?  Maybe more?

It wasn’t long before a whitetail doe eased out and into a little opening in front of me. I fired multiple times immediately – six or seven shots within just a couple of seconds.

Then, suddenly, a buck appeared, like a ghost, out of the edge of the darkness and into the light, right behind the doe, looking squarely at me, eye’s piercing me like the sharpest arrow.  Like all giant bucks. He knew all along where I was. At least it sure seemed like he did. But, it didn’t matter. It was too late for him.

Like NBA marksman, Clay Thompson, my arms were already raised and ready for the shot. He didn’t know I was looking at him through my camera lens. Click, click, click, click…

I got him!  The wait — in the cold blind — had definitely been worth it.

Picture of an Iowa whitetail buck.


Wew..I had to stop and catch my breath. My heart and adrenaline, surging, even though I was just sitting there.    

Easy does it, I told myself. I got him!  That’s how it goes when hunting with a camera.  Sometimes, that is. When you get lucky!

Just like when hunting with a bow or gun, with wildlife photography, you work at it and when you are prepared luck seems to come easier.

And, I can assure you this, hunting with a camera is lots of fun. Great fun, for sure. Yet, for the life of me, I don’t fully understand why more people aren’t doing it? Sure, I get the fact that you don’t get to bring back any meat when hunting with a camera. No doubt about that. Not unless you stop at the grocery store on the way home, that is.  And that is the main reason why I hunt with a bow or gun, to bring back high-quality low fat and super healthy venison or other game for the family to enjoy. That doesn’t happen when I hunt with my camera.

So why do it?

Some people don’t seem to get it. Even people whom I would think would get it, like other hunters that I know and wildlife professionals.  In fact, just this past fall I was talking to a park ranger and he just asked me point-blank why take wildlife pictures? And, what do you do with the pictures?


Picture of a red fox.

Nothing like calling in predators in the winter! It’s fun hunting them with bow or gun. But it’s also great bringing home images for the wall with the camera!


Before I talk about that let me first say that when I go hunting with a bow or gun a HUGE reason lies in the thrill of the chase. 

Trying to outwit something on their own turf is addicting (and that is also why I love to fish).  When I hunt the fields and forests around me with a camera, I can still do this. Plus, with camera, I can always bring something home – memories in the form of pictures. Now, for sure, they aren’t always great pictures. But I get to bring back pictures of the animals I see to share with friends and family, nonetheless. This is huge.  Ring enough one up for wildlife photography!


It is awesome to be able to share the experiences that I have in the field with friends and loved ones who were not there. When I hunt traditionally, that is, with bow or gun, I often don’t bring home anything to share but invisible stories. I don’t always bring home meat that’s for sure!

And, maybe because I am getting older, it’s the sharing of the experience that is really deeply and genuinely valued and is so rewarding. The pictures I bring home every time I come back from “camera hunting” let me do that in a great visual fashion that people don’t have to imagine or believe. Now, I’ve got proof that really did encounter that monster buck! Much of the “trying to outwit something” reason that I hunt or fish, is a reason involving challenge. That is a huge part of why I go hunting — for the challenge of the endeavor itself – trying to bag that animal and/or even the challenge of the process (dealing with the weather, example). This is all kept as part of the camera hunting endeavor as well. You don’t lose these things with camera hunting. In fact, one could argue that hunting with a camera is even more challenging.  At least, it can be, at times!

Whitetail buck in Iowa.

This nice whitetail was out and about one November morning checking scrapes when I shot him with my Canon!


Let me quickly qualify that last statement – camera hunting can be as challenging as you make it because there is the constant challenge of creating a higher quality image than the previous one. That is a huge reason why I love camera hunting too. The challenge of trying to create not just a technically good image but a technically or even artistically great one!


And think of this benefit when hunting with a camera – there are NO SEASONS. You can “hunt” deer any time of year you wish. You say you’d like to go “hunting” month before the season opens – no big deal, go right ahead!  And, using a camera, you can now “hunt” most wildlife refuges, national and state parks!  Additionally, you don’t have any licensing expenses to deal with! Obviously, the door opens way up with great options when you pick up a camera to hunt with!

I realize that many folks just don’t think it will be “the same” as when hunting with a bow or gun. That somehow the “thrill” just won’t be there.

I think that is something you would have to decide for yourself. I can tell you that it is just what you make it out to be. Photographs, like fingerprints, are all different. And it isn’t easy producing great images on a regular basis– despite today’s fantastic equipment. In fact, one “keeper” for every half dozen shots is sort of typical. And, getting one “wall hanger” type of image might take you a few hundred shots. Photography isn’t as simple as pointing and shooting. At least, getting great images on a regular basis isn’t about that. But that is why I like it. Again it’s that challenge. If it was easy it would be boring and it would be hard to find the satisfaction of doing it. The thrill of accomplishment – finally being able to get a great image after all the lighting and setup challenges definitely exist. I think that is what allot of people may think. That hunting animals with a camera instead of with a bow or gun would be boring and maybe not satisfying. Again, it’s all about what you make of it. But I definitely don’t find that to be true at all. But wildlife photography is what you want it to be. If you like to push the limits, if you are like many hunters and love the challenges in the field, then there is a good bet you might also like the challenges of getting great images of the animals you pursue with a camera in hand. If you’re one that likes to push for things. You can push for an unlimited amount of challenge growth with wildlife photography.


And you are already on step 8 on a scale of 1-10 on what it takes to get that great image if you are a hunter –  that is, getting to know your subject and how to get close to your subject on a regular basis. As a hunter you already know how to accomplish this.


Picrture of a canada goose in flight.


I love shooting waterfowl with a camera (I love hunting them as well). But when the season is over and there are still lots of birds around — might as well go bring back some images to share or for the wall!


Do you know how to Shoot a Camera?


The type of camera I’m talking about using here is a DSLR (Digital Single Lens Reflex).

You know, the great big cameras those guys hanging around the end zones and sidelines of sporting events have!  You know the ones. I won’t get into how to use a DSLR here because I don’t have the space for that. You’ll have to do some Internet browsing for that. There are guides and books on that subject widely available. If you’ve never used one, then it’ll take a little bit of study. Not that much, though. Rest assured, if I can use one so can you! If you want to get out there and do some wildlife photography, then I’m sure you’ll probably be excited to spend a little bit of time learning the basics of the camera itself. You can do it and it’s worth learning.

Probably the single biggest setting that I use in the field is called aperture-priority mode. This is where you get to decide how much focus you want for the photograph (example: just the eye’s and face or more corner-to-corner?). This setting lets you be the guide and the camera does the rest. It’s really not too hard!

Camera brands: There are several brands. The top brands today, as you may already know, are Canon, Nikon and Sony (in no particular order).  I use Canon gear but I have also used Nikon and both make top quality gear. Sony does as well. I’ll talk about Canon gear in this post only because that is what I’m most familiar with (not because they are better than any other brand.  Although, I must say I love my Canon’s!)


keep in mind that I am not a wildlife photography pro! I am just a guy, maybe like you, who has some knowledge of photography and has a deep interest in hunting. I’m just a guy combining the two!  

The reason I choose Canon is because I invested in one of their cameras a while back and then bought a couple of their lenses. Once I got vested into them, it was no turning back. And I haven’t been disappointed at all. They have a superb array of other items like lenses, teleconverters, etc., for the type of shooting that I like to do, which is, of course, wildlife.

If you watch a sporting event, you will see allot of big white lenses – these are canon pro lenses. I would say most pro sporting photographers shoot one of these three systems – and I would say more pro’s shoot Canon than anything else, followed by closely by Nikon.

Again, several companies make great gear and pro quality systems. I’m no pro that’s for sure but I just got into the Canon system a while back and bought some of their lenses so I’ve been sticking with them. Had I bought Nikon or Sony stuff previously I probably would be sticking with them.  It gets expensive to keep switching around once you invest in some of the gear of one brand.

Something to remember is that what you are really buying when it comes to acquiring wildlife photography gear, is not just a camera but a system that goes with it. Lenses are at the top of the list, of course, and it’s good advice to get good lenses and don’t skimp on quality here. The route I’ve chosen to go involving price point is sort of right down the middle. My cameras are basically “serious amateur” level and I try to find the best deals on the highest rated lenses that I can find. Again…one could go on and on about this. But I don’t have

The route I’ve chosen to go involving price point is sort of right down the middle. My cameras are basically “serious amateur” level and I try to find the best deals on the highest rated lenses that I can find.

Again…one could go on and on about this, but I don’t have space here to do that. You’ll want to read up on top choices for wildlife photography. The Internet is full of information on that.  It’s all about what system offers the best choices for the type of shooting that you will be doing.  There is a ton of information out there discussing the pros and cons of the different camera systems available today.

Type of Equipment: I like a camera that has a quiet shutter and one with great focus ability in low light; and, produces one that produces high-quality images with low grain, when doing deer photography, in low light conditions.  These are big demands.

The Canon 6D fills these needs perfectly.


Picture of a Canon EOS 6D

The Canon EOS 6D does a great job in low-light and with high ISO settings. It has a pretty quiet shutter drive, too. This makes it great for shooting wildlife in low-light conditions at close range.


The Canon 6D  is not a cheap camera, by any means. But it isn’t in outer-space, price-wise either (about $1500 for the body only currently on Amazon).   This camera sort of lies in the middle-end of the spectrum and would be classified as a “serious or semi-pro” type camera. It’ll work hard for you for years and years of service so long as it’s cared for.  And the 6D will is capable of producing images that could easily go on the cover of any magazine or that could be enlarged to poster size for that office wall!

With this, I’ll usually carry a 70-200 f/4 IS mm zoom ($599 on Amazon) with a 1.4x II extender ($195 on Amazon) and a 300 mm f/4 IS lens ($1350.00 on Amazon) that uses the same converter.   However — if I were just getting into wildlife photography at this level I would get the Canon 100-400 mm f/4.5-5.6 IS II zoom lens (about $2,050 on Amazon).  I would get this lens instead of getting the other two previously mentioned lenses.  Why?  Because this one lens covers the same bases as the other two and also gives you 100 mm longer reach.  This is a new lens but has glowing reviews and is a pro-grade lens in all respects. The Canon 6D has been around for a few years now but it still is a very capable camera that produces pro-quality results (with practice). The Canon 6D works great for most whitetail photography and it’s auto-focus system and shutter speed is certainly adequate to get great shots of deer running or jumping a fence.

Canon 70-200 f/4 zoom lens picture.

The Canon 70-200 f/4 is a great all-around nature and wildlife lens for larger subjects that aren’t too far off — say 30 yards or so with deer. I prefer the IS version which makes it easier to hand-hold and get sharp images, especially in low light.


There are other cheaper alternatives for getting good lenses — choices from Sigma and Tamron, for example, that cover the same focal lengths as those just mentioned will get the same job done at a fraction of the cost.  You might want to do some research on these and look at some lens reviews.  These companies, and others make some top-notch glass but, generally, tend to fall shy of the quality that a camera company puts out on their own lenses.   I’ve had one Sigma lens and it was built like a tank and took some great photos.  I don’t think the brightness and overall “pop” of the images it produced were as good as my Canon glass, however.  With technology changing so fast, the margin of quality between the lenses that Canon, Nikon, Sony, etc., put out and some of the third-party lenses makers just mentioned is narrowing greatly.  In some cases, there may be no difference in quality.  Again…you may want to do your own research on this before buying a lens.


Back to the camera:  The  Canon 6D has been around for a few years now but it still is a very capable camera that produces pro-quality results (with practice). It works great for most whitetail photography and it’s auto-focus system and shutter speed is certainly adequate to get great shots of deer running or jumping a fence.


zoomed in view of Canon 300 f/4 lens


The 6D is a full-frame camera with no built in “lens multiplier” effect. You might want to read up on that if desired. The bottom line is that this is a great camera for low-light, deer photography at close or semi-close range with the lenses mentioned above. There’s no doubt you could get a 500 mm or even a 600 mm lens and shoot deer at longer ranges. But with a 300-400 mm lens and a 1.4X or even a 2X converter (lens multiplier), one can capture some great shots out to 60 or even 70 yards or so.

Canon 1.4x teleconverter

An extender is placed between the body of the camera and the lens and effectively “zooms” in the subject by the specified amount.

So we are pretty much talking about photographing deer just out past long bow hunting range with this setup.  If you wanted to be able to shoot deer at longer ranges with excellent results with this camera you would need that 500 or 600 mm lens which will amp up your equipment acquisition costs a few thousand dollars!  If your main goal in wildlife photography is to shoot fast-moving subjects, in general, such as birds in flight or lots of running and jumping – or other – fast action shots of wildlife, then a camera that shoots faster than the 6D would be better (the 6D shoots at 4.5 frames per second, top-end, which would seem to be fast enough, but the faster the better for really fast moving subjects!)

My Canon 60D (not the 6D but the 60D) is certainly adequate for some of this type of shooting but the Canon 7D – which I don’t have – (shoots up to 8-frames per second, fps) or the 7D Mark 2 (upgrade to the 7D in both image quality and speed of shooting – up to 10 fps with Mark 2) would certainly be better. If I had to choose, I would get the 7D Mark 2 for my main wildlife camera.  But, I would still use the Canon 6D for those times when “quiet shooting” and shooting in very low light is of paramount importance. Such as when shooting within 25 yards out of a blind.

Something you might want to read up on would be about the “crop factor” some of these cameras have – the 60D, 7D, and 7D Mark 2.  These cameras “crop” the image by way of the design of their smaller sensor. The result is that the image seems closer than it really is. So when using any suitable lens on these cameras the result is magnified by 60% (example a 200mm lens on a crop-factor camera effectively becomes a 320 mm lens; a 100 mm lens becomes a 160 mm lens., etc., etc.) What this means is that you can get by with a shorter lens on these cameras because your camera automatically makes it acts like a longer one – this helps with long lens expense, big time!

If you don’t need as big of a lens, then you don’t have to spend as much money (typically, lens cost goes up with lens length).  So a crop-sensor camera – or crop factor camera – gives you more reach than does full-frame camera like the 6D. I won’t examine this too much more in this post. For sure there are pros and cons of each. For the wildlife shooter, a top-notch camera like the 7D Mark 2 with the built-in crop factor is hard to beat in most situations.   (Some pros who must have the ultimate in top-notch image quality stay away from crop factor cameras.  Also, most landscape photographers do as

Some pros who must have the ultimate in top-notch image quality stay away from crop factor cameras and just use cameras with full-frame sensors, like the EOS 6D.  (There may be a slight drop in overall image quality when using a crop-sensor camera vs. one with a full-frame sensor).  Also, most landscape photographers avoid crop-sensor cameras as well, because it limits their ability to use the widest angle lenses that they prefer because of that particular photography style. I hope that you are not confused by any of the “tech”

I hope that you are not confused by any of the “tech” talk above. Getting started shooting a DSLR is really not that hard. And the fun part is chasing the animals with one and bringing back great images.

It’s a constant challenge but that is where the fun lies.

Seasons? What seasons?

A refuge – who cares!

Now is as good of a time as any to get started at this. But let me warn you – shooting wildlife with a Canon is addicting! Have fun!


A little Tech Talk and some Money Saving Ideas:

Okay, let’s talk reality here.  What’s this going to cost?


Full-Frame Camera:


Canon EOS 6D:  $1500.00 on Amazon  (this is an awesome camera for low light shooting and has a really quiet shutter too)


Crop-Sensor Cameras:  (have a 1.6 X lens multiplier effect on the image)


Canon EOS 60D:    $850 on Amazon (or get a used one there for under $400)

Canon EOS 40D:  Not discussed in this post BUT I have one and this older camera model produces great results!  It isn’t made anymore — I don’t believe –but they still sell them.  I think you can get one for around $200 on Amazon.  It’s a crop-sensor camera and would be an awesome starter camera.  It may shoot slower and not focus as fast as the newer “kids on the block” but it’ll kick out magazine and poster quality shots if you do your part and hold it steady and shoot with a quality lens!


You can spend more on a crop sensor camera too, of course!


If I wanted a top-end wildlife shooting machine, and I do, I would save up and get the Canon EOS 7D Mark 2  (and I hope to)!


Canon Eos 7D mark 2

One of the top wildlife cameras available today would have to be the Canon EOS 7D Mark 2. Image courtesy By A.Savin, CC BY-SA 3.0, https://commons.wikimedia.org/w/index.php?curid=37829200


The 7D Mark 2 sells for about $1500 on Amazon and fires away at up to 10 frames per second and has super fast autofocus ability, as well.  It is a fairly new camera and is a substantial upgrade of the older EOS 7D (now discontinued by Canon but you can still buy them on Amazon for about $850.).  This was/is a great camera, as well, but performance-wise the newer Mark 2 version reportedly beats it in just about every respect (I don’t know, because I have not shot either one.)  The choice is yours!


When it comes to getting a great wildlife lens.  I would be one and done these days! That is the new Canon 100-400 mm f/4-5.6 IS 11 zoom would be my main choice if I were just gearing up.  This lens is all you would really need!  The reviews I have seen on this newer and updated design of the old version of this lens are pretty fantastic. This lens runs about $1700 on Amazon and you can still find the older model for about half that.


Canon 100-400 mark-2

The Canon 100-400 Mark 2 is an updated of the older version and is reported to be better in all respects. This would make the ideal one-lens-does-all wildlife lens for many people!

Canon 100-400 f/4-5.6 zoom lens

The original Canon 100-400 L Lens. Not as good as the newer version but is still a great all-around wildlife lens and has been used by pros to produce magazine quality images for years. It’s still available and is about half the cost of the new design.


Keep in mind that when it comes to saving money, it is a better idea to save on the camera and invest more into the lens! 


You could opt for a used Canon 40D or 50D (not discussed but a slight upgrade of the 40D and still available used) for under $300 and one of the Canon 100-400 mm lenses just discussed.


Other Stuff:


You’ll want to start looking into tripods if you do much shooting.  Although, with today’s camera’s and the internal stabilization systems that they use, it is much easier to get high-quality photographs without a tripod than it used to be.

Plus, the digital quality has gotten so good that one can shoot in very low light these days without the need for a tripod either.


I say without the need for one…that is not to say that you wouldn’t get better photographs without support — because you would!  However, sneaking around the farm with a tripod is just plain cumbersome and non-fun! So, I rarely take one these days except for low-light shooting out of a blind or something similar.


A bean-bag is almost a necessity.  They are inexpensive and allow you to really get a good stable shot with your camera.  

Use one balanced on the edge of your half-rolled down truck or car window when you drive around a refuge or park.  This will support your camera almost as well as a tripod when you have to stop suddenly to take that picture of that monster buck along the edge of the road!